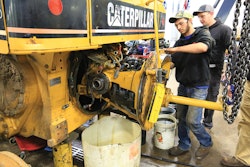
One thing I like do when I conduct shop audits throughout the country is to ask the technicians if I can see their torque wrenches since they are vital precision measurement tools. Torque wrenches need to be taken care of properly and periodically calibrated.
Often, when I ask technicians when they last calibrated their torque wrenches, they cannot tell me. Most are surprised when I inform them that they can calibrate clicker-style torque wrenches themselves. This may not be as good as sending it to a professional, but it is a good practice in between certifications and better than not doing any calibration.
Below, I will go through the steps to inspect the torque wrench calibration. We will also cover the adjustments you can make if the calibration shows that it is not giving accurate readings for the specified torque setting.
To perform this calibration, you will need:
• Clicker-style torque wrench
• Marker or paint pen
• Tape measure
• Vise secured to a bench, or lug nut attached to a piece of equipment
• 20- to 35-pound weight
• Rope or string with a load rating that is capable of holding the weight
• Means to record calculations
• Safety-toe shoes

Step 1: Capture your measurement
When measuring your torque wrench, always measure from the center of the square drive, where you attached the socket. Use whole inches versus partial inches to make your calculations easier. Lastly, mark the handle where you stop your measurement. I typically use a black permanent marker. I used an 18-inch torque wrench, the typical length of a torque wrench, and I made my mark at 15 inches, which is the measurement we will use for this tutorial. Record this measurement as you will reference it later.

Step 2: Secure your torque wrench
This step works best if you have a vise that you can lock your torque wrench into. If a vice is not available, put a socket on your torque wrench and secure the socket and wrench on the lug nut of a piece of equipment. Be sure to allow yourself ample vertical room to attach a rope and weight to perform the calibration test. Secure the square end of your torque wrench in your vise – or your lug nut, if using that method (use caution to not overtighten and cause damage to your drive).


Face the handle outward so your bench will not hinder the rope and weight. Be sure the square drive is the only thing clamped in your vise, so the handle can move without restrictions. If doing this on a piece of equipment, place cardboard behind the wrench so you do not accidentally damage the equipment body by the weight hanging from your rope. And wear steel-toe or composite-toe shoes or boots, in case something slips and the weight comes crashing down.
Step 3: Performing your calculations
To obtain the correct setting for your torque wrench, you will need to multiply the distance from step one by whatever weight you will be using to get the inch-pounds. (For this example, we will use a 20-pound weight.) Then divide that number by 12, which will give you the foot-pounds. Keep in mind, if you are using different measurements or lengths, your numbers will be different.
So our calculations look like this:

• 15 inches x 20 pounds = 300 inch-pounds
• 300 inch-pounds / 12 = 25 foot-pounds
Step 4: Securing weight to perform calibration check
• Tie the rope or cable around your weight
• Make a loop at the other end that is large enough to slide over your torque wrench handle easily. (Make sure the rope is at a length to where the weight will not touch the ground.)
• Set your torque wrench to 25 foot-pounds
• Hang the loop end of the rope on your torque wrench where you made your mark in step one (15 inches for us) so that the weight is now suspended.
If your torque wrench clicked once, the weight was applied, then set it to 26 foot-pounds. If it did not click, then your torque wrench is accurate already. If it did click, you will need to continue following the steps below to adjust your torque wrench.
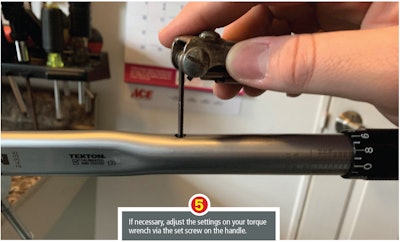

Step 5: Adjusting your torque wrench
Most of the time you can adjust your torque wrenches by tightening the tension spring. These are located along the middle of your torque wrench or under your handle, which will require a little more work to access. It also may require altering your measurements to make your adjustments with the weight attached if your mark falls on the set screw placement. Ensure that your torque wrench is still set to the foot-pounds from your calculation that was done in Step 3.
• Hang the loop end of your rope with the weight on your mark from Step 1. (This may be different if you had to remove the handle to access the set screw.)

• If you did not hear it click, you will need to remove the weight and tighten the set screw clockwise in small increments.
• Hang the loop end of the rope with your weight back on the mark on your torque wrench and listen for the click again to test if that adjustment was enough. If you do not hear the click again, you will need to keep repeating this process until you do.
• Once you hear a click, remove the weight and reattach your handle (if you had to remove it to perform the adjustment).
Now your torque wrench has been tested, and you can feel comfortable that your tool is applying the appropriate amount of torque. If you can’t adjust your torque wrench by these methods, send it to a professional or purchase a new one.