Editor’s Note: This is the third in our four-part GPS/GNSS 101 series. To read more, click here.

To get the accuracy these systems are capable of, you need to accurately dial in the site, calibrate your rovers and machines to the site, and occasionally calibrate the machine to itself. It’s a bit like a machinist setting up the tooling on a drill press or lathe to fabricate a perfectly dimensioned machine part, except that the part you’re machining is a plot of ground, often many acres in size, and the tool you’re using is a 70-ton dozer.
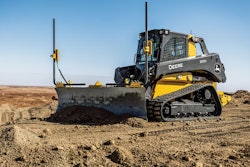
We asked Tim Houchens, integrated solutions manager for Flint Construction and Forestry Division, a Deere dealer in Atlanta, to show us how to set up and run GPS dozing operations efficiently and accurately, and how to avoid some of the common mistakes contractors sometimes make.
There are currently three OEMs offering factory-ready GPS dozers (Caterpillar, Deere and Komatsu) and three companies that make aftermarket kits that can be set up on most any dozer (Leica, Topcon and Trimble). There are small differences in every system, and you will need manufacturer-specific training on any system you buy. (See more on the training requirements on page 46.) Nevertheless, the basic principles and techniques of GPS dozer operations are fairly common to all brands. Check out the video on how this works below.
Hardware requirements
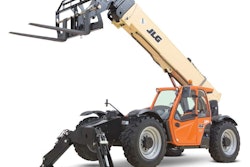
In addition to the GPS-enabled dozer you will need a base station to receive and correct the GPS signals, and a radio transmitter to broadcast these signals to the field. Most of today’s receivers have the radio built in. For more on these, see our GPS 101 article on page 25 of the June issue (this is also available on our website).
A rover also receives GPS signals and is mounted on a portable pole that you carry into the field or on an ATV or vehicle. The rover is used as a GPS measurement device for topo surveys and stockpiles and it is also used to localize the machine to the site. Rovers typically contain a data collector with a monitor. This data collector contains and manages data files the same as a machine.


Step one: Comprehensive survey
Before dirt is moved or machines placed on the site, a traditional site survey is performed. This will verify that the real-world topography matches what the plans describe, and it will set up four or five control points from which all the other measurements will be taken.
“You can do that with a rover on a pole, or a rover in an ATV or a vehicle,” Houchens says. “That’s a common practice to quickly drive a grid and get an existing topo.” Drones outfitted with survey equipment, however, are starting to fill that role as a quick way of measuring existing topography.
Step two: Create a 3D model
The survey data is entered into the rover’s data collector and taken back to the company’s estimators or engineers. They will compare existing topography with the site plan and turn this data into a digitized site model that can be exported into the machine. Companies that don’t have the engineering resources on staff to do this typically hire the job out.
Modeling costs will vary, depending on whether the owner or contractor is paying for some of the initial surveying, Houchens says, but it is usually less than 1 percent of the cost of the bid. If you’re working with a residential site plan, some providers will charge by the number of houses on the site. For highway plans, the price may be based on the number of lane miles and/or the complexity of the job, Houchens says.

Once those plans are created, they can be loaded onto the machine with a memory card or USB thumb drive. More sophisticated systems will allow you to download the plans into the machine using its telematics system.
Step three: Localization
This is simply matching up the plan design with the northing and easting coordinates and latitude/longitude global reference of the GPS grid, Houchens says. “This is done one time per job. You go around to each control point that was established in the comprehensive survey earlier and take an observation with a rover, but you use a rover on a pole, not a machine or ATV, for better accuracy.”
You go to the surveyed point, set the tip of the rover on that point and remain there for a minute or two. “It gets a better answer the longer you keep it there,” Houchens says.
This aligns the actual location of the control points with the theoretical values of the plan. The localization data is entered into the rover and synchronized with the plans going into the dozer. From that point on, everybody and every rover and machine uses that data for the duration of the job.
“If you don’t go through this process, the dozer literally does not know where it is, even though it is receiving corrections from the base station,” Houchens says. “It knows its latitude and longitude, but it has no idea of how to reference the jobsite. You can get errors in your jobsite three months later by having a bad localization. If you have a bad shot and it’s a couple tenths low, your plan on that corner of the jobsite is going to warp a little bit low and be off grade.”
Step four: Daily checks

At the beginning of every day, Houchens recommends you start the dozer and then move it forward and reverse for a few yards just to wake up all the sensors. Then you need to physically check the location of the blade.
The preferred method is to have a flat curb or a concrete block that you rest or bench the edge of the blade on. Let the sensors and the GPS give you a reading and if that reading corresponds with what your rover says – bingo – you’re ready for work. If not, most systems today will allow you to enter a corrected value into the machine’s monitor and proceed with that corrected value. “The rover is just another way to tell you that the machine is getting the right answer or not,” Houchens says.
If you don’t have a bench on which to rest the blade, you can put the bottom tip of the rover pole on the bottom edge of the blade and measure it that way (see photo above).
One of the benefits touted by manufacturers of GPS equipment and machines is that they reduce manpower requirements, particularly on the survey side. But Houchens cautions that GPS earthmoving is not a one-man job. You need another person on-foot, with the rover to double check results periodically.
“That first check on blade is a starting point, and you have to do that,” Houchens says. “But I’m not fully satisfied until the machine is pushing dirt and it’s agreeing with the rover. Come back behind the machine and check the material to make sure that the result is correct as well. You’re going to have to have somebody there. He doesn’t have to follow the dozer all day, but he should be checking throughout the day. That’s just good technique.”
Step five: Calibrate the machine to itself
For a GPS system to function properly, the body of the dozer must be calibrated to be square to the blade and any sensors on the blade of body of the machine should be oriented just as they came from the factory.
This is not a check you need to make frequently or on any kind of schedule, but if you are getting inconsistent results, or your operators report that something isn’t quite right, a calibration is recommended. Since each manufacturer has a slightly different process and different software interfaces, we won’t go into the details here. But it should only take about 15 minutes and should be covered in your manufacturers training.
Training requirements
There’s no getting around the need for manufacturer- and model-specific training on GPS systems. Houchens says for someone completely new to GPS earthmoving, three to five days training is typical, equally split between the classroom and the field. For somebody who already has a base and rover and is adding a machine, two to three days should suffice. Customers who are already doing GPS bulldozing can typically become trained on a new system in a day.
Who should get the training? That varies depending on the company. It might be the owner operators in smaller companies. Larger companies may send supervisors and operators, or their GPS lead people. Even estimators are trained so that they can understand how the process affects bids and cost calculations.