While a second-life grader may not be the precision machine required on some jobs, a well-maintained machine still has years of useful life ahead of it.
By Marcia Gruver Doyle
“I’ve taught all my guys to go through a machine’s power train first and then go on to the working tools, which on a grader is primarily the blade,” says Max Miller, used equipment manager and branch manager, Murphy Tractor & Equipment, Gering, Nebraska. And with 30 years of experience, Miller has taught a number of people the fine points of how to thoroughly inspect used machines.
 Max Miller
And so we head first to the engine compartment on our inspection machine, a 1997 John Deere 770CH. Miller pulls the engine oil dipstick and notes there are no problems that can be seen with the naked eye with either the oil cleanliness or level. (In addition to the visual inspection, always get an oil analysis report.) If there is discoloration, it could mean the machine has engine issues. A milky substance would indicate the presence of water in the crankcase, which could be the sign of a blown head gasket.
Next Miller checks for leaks. “Everywhere there’s a gasket there’s an opportunity for a leak,” he says, so there are a number of areas to be checked, including between the valve cover and the head, the head and the block, the block and the intercooler and the block and the turbocharger. Other places for potential leaks in the engine compartment include the oil pan, transfer pump, fuel injection pump, around fuel supply lines, water pump and exhaust manifold. While in the compartment, also look at the engine belts to determine if they need replacing.
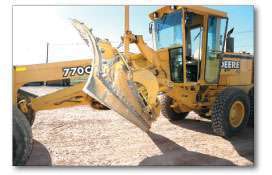 Make sure blade wear hasn’t gotten into the bolt hole area, which can be an expensive repair.
Also check coolant, transmission and hydraulic fluids and take note of all fluid levels, Miller says. “If they are all low or overfull, that’s suspicious,” he says. Coolant should be clear and clean of any corrosion or oil.
While the radiator is cold, examine the condition of the upper and lower mounts on the radiator and whether there any leaks in the top and lower tanks. Make sure the fins are clean and intact, the core is in good condition and note any hose leaks. Look for any signs of coolant leaks in frame. Coolant leaks can also show up as chalky deposits on the radiator seams.
And before you get into the cab to do your operational checks; walk around the machine and look for any serious signs of damage or abuse including sheet metal dents, plates or welds, cut tire sidewalls or broken glass.
Operational checks
Start the engine and allow it to warm up. Check the oil pressure gauge to make sure it’s operating correctly. “Look for smoke and if there’s smoke, note the color,” Miller says. White means there’s coolant in the engine, blue smoke means it’s burning too much oil and black smoke is an indication of excess diesel. All require further investigation.
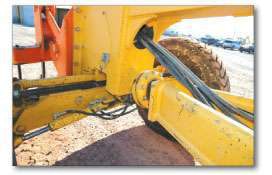 The axle pivot joint bears a lot of stress, so look for looseness in the pins and bushings.
While waiting for the engine to warm up, look over the general condition of the cab. Are all gauges working properly? Can you quickly adjust the seat to your frame? Are there any problems with the glass? We’ll go over the cab in further detail later on, but this is a good chance to see if anything jumps out.
Also listen to the engine. Is it making any unusual noises? “Ticks always turn into knocks,” Miller says. “A noise never goes away in an engine. It either gets repaired or it gets worse.” And remember that today’s cleaner burning engines have more complicated air- intake systems. “If there’s a leak, it will be obvious when you crank the machine up because it will make a loud whistling sound,” Miller says. “You’ll also have a lot more smoke because you’re not getting air to the engine.”
Miller likes to encourage prospective buyers to put the machine through its paces. The 770CH has eight forward and eight reverse speeds. If there’s room, take it out in an open area and shift it through each gear. Note if there are any hesitations or skipped gears – both would prompt further investigation of the transmission. If you can’t move the machine, run it through all of its gears several times while in place to make sure it engages smoothly in each. Test the brakes and backup alarms.
Once the grader is warmed up, cycle through all the hydraulic control valves in the cab to make sure they’re working properly. Watch for quick, smooth responses from the hydraulic system.
Engines and transmissions are expensive repairs – usually around $10,000 to $15,000 – so the overall worth of the machine becomes a critical factor when considering replacement. “It doesn’t make sense to put $15,000 into a machine that’s worth $20,000,” Miller notes.
But graders are hardy work horses. Most will give you 8,000 to 12,000 hours before you have to rebuild or replace a major component. “We see lots of machines that have a total life of 30,000 hours,” Miller says.
Circle and moldboard area
Circle wear points are critical. “All it takes is an eighth of an inch here and there, and all of the sudden you’re 3?8 of an inch out of alignment,” Miller says. “That won’t work when you’re trying to get within a tenth of an inch on a grade.” Miller likes the nylon shim system on Deere grader circles, which can be easily replaced with a 9?16-inch wrench. “They took what used to be an all-day job and reduced it to about two hours,” he says. Note the wear on these shims, or wear strips. Expect to see more wear strip wear on the front side of the circle than on the back.
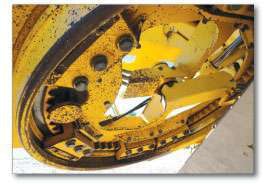 Look at the condition of the drive gear and pinion seals on the circle, and check for cracks and welds.
Examine the ease of rotation by the circle drive motor, and the condition of the drive gear and pinion seals. Are there any cracks or welds on the circle? How many circle shoes need replacing? Check the tightness of the ball sockets and draft ball.
Next check the stirrup arm joints. These joints are commonly loose on used machines – and expensive to repair. If there’s play in this joint, it allows the lift cylinders to move up and down, which in turn moves your blade up and down, decreasing grading accuracy.
There are a number of joints and cylinders in this area to inspect, including the cylinders to the circle and frame, and the draft frame to the main frame. “You’ll notice that graders usually have ball joints because they give you flexibility in such operations as swinging the blade out 90 degrees, plus they last a lot longer,” Miller says. Look for looseness between the ball joint and the cap. And all cylinders should be dry.
Sometimes the one-way saddle cylinder will leak, dropping oil on to the circle, which can get into a circle’s wear components, taking the grader’s shims out faster. “The dryer a machine is, the longer everything will last,” Miller says. “The other problem with a leaky hydraulic cylinder is that if oil is coming out, dirt is getting in, contaminating your hydraulic system.”
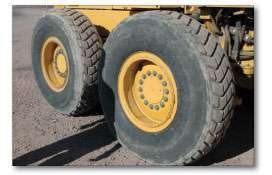 Miller determined the rear wheels on our inspection machine had about 50 percent of tread remaining.
Make sure the moldboard, or blade, hasn’t worn to the point the wear has extended into the bolt holes where the cutting edges tie on. Some owners don’t change their cutting edges quick enough and they start wearing against the base of the blade, creating an expensive repair.
More on joints
One joint that can be commonly missed in an inspection is the axle pivot on the front of the machine. If the bearings are loose, it will allow the front axle to move up and down, which in turn moves the entire machine up and down, and decreases your grading accuracy. Also look at the steering pins and cylinders. “Front axles are a high wear item on a grader,” Miller explains. “They steer all the time and carry a lot of weight and they’re against the load of the blade. To rebuild an axle will cost anywhere from $6,000 to $10,000 dollars, so you want to check all the joints for tightness.”
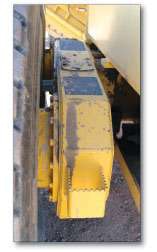 Dirt can pack into the wheels on rear tandem drives, taking axle seals out. The 770CH tandems looked good, however.
Next check the rear tandem drive axles. “If you run in the dirt a lot, dirt will get up in here and pack in these wheels and take the seal out and you could get a leak on the axle seal,” Miller says. Just look inside the wheel. If there’s anything accumulating on the inside of the wheel, you probably have an oil leak.
The articulation joint – which allows the back end of the machine to turn behind the cab, making sharper turns – is critical to inspect. If it gets loose, it could allow the tractor to have too much up and down movement, affecting your ability to precision grade. “It’s typically replaced after 10,000 hours, so it’s a job that’s due on this machine,” Miller says. If the problem is caught before it has to be line bored, it will cost around $5,000, but add another $3,000 if line boring is required.
In the cab
“You don’t think a seat is important, but it is,” Miller asserts. “If you’re in it all day long, you want something that’s going to support you.” So make sure all seat functions – including the arm rest adjustments – easily work.
Other quick-to-irritate items include an out-of-adjustment control console, leaking valves in the cab floor and non-working wipers.
Glass is also critical. “You don’t want to drive with a pitted windshield in the sun,” Miller says, “and you want a clean view to the circle and blade.” Check out the front glass sections that go down to the cab floor, since they’re susceptible to pitting from rocks thrown up by the front wheels. Our inspection machine had a wiper path on the glass. “A good operator would want a new windshield,” Miller comments.
Other cab inspection items:
• Make sure the door seals correctly, so heat and air conditioning stays in the cab. Also check that the door latch keeps the door open when you want it to be open.
• All control levers should operate smoothly.
• Check all mirrors, gauges, pedals and steps – and don’t forget the seat belt.
• Work the heat and air conditioning and check whether all air flow vents are intact.
• All of the following should be in working order: flashers, lights, wipers, washers, turn signals, defroster fans, accelerator and decelerator.
Match tandem tires
“Everyone gets hung up on tires, which amazes me, because they are the easiest things to replace,” Miller says. “Some people will miss the mechanical stuff that might cost them thousands of dollars, and concentrate on the tires. I tell people to buy the type and tread of tire they like. Get the mechanical stuff right and then pick out the tires you want.”
Keep in mind, however, you do need matched tires in the rear. If you have mismatched tires, you are putting undue stress on your tandem drive chains and on the driveline itself. The recapped rear tires on our machine were at about 50 percent wear.
Our machine
While it wouldn’t have all the bells and whistles – necessary to most highway contractors – of a new comparatively sized grader, our inspection machine also wouldn’t carry a $200,000 to $225,000 price tag. “A lot of these machines would go to a small contractor,” Miller comments, “who will live with this machine exactly as it is – he’s doing rough cuts, small pads, dirt jobs and he doesn’t have to run GPS or be within a 10th of an inch. He’d probably run this blade, even with all the wear items we mentioned, for another 500 hours. Or this could go to a small town that would put 100 hours a year on it, and it could last 20 years.”
And if a buyer wanted more precision grading ability, Miller estimates it would take about $2,500 to tighten up our machine.
But on a scale of 10, Miller would give our grader, priced between $50,000 to $60,000, a 6 or 7. “It’s relatively tight, and all cab features work. It could go to work today.” EW
GRADER INSPECTION LIST
General
Model/Year:____________
Serial number: _____________
Hours:___________________
Operator manual available? ___Yes ___No
List machine options: Paint condition: Sheet metal condition:
Cab
Condition of:
• Adjustable steering column • Seat, including seat back, bottom, arm rests,
sliding function and seat suspension • Seat belt • Floormat • Liners • Door hinges • Glass – any cracks, scratches or pits? • Window seals Dome light works? Door latches work? Horn work? Radio work? Mirrors: interior, left hand and right hand
Operational checks
Run engine and check in high and low idle:
• Any smoke? • Unusual noises or knocking? • Sufficient power? Check gear ranges in forward Check gear ranges in reverse Check lever shifter Check brakes Check pilot controller(s), if applicable Heater operation A/C operation Are all vents intact? Back up alarm Parking brake Neutral start/hydraulic lock out
Gauges and controls
Condition of:
• Articulation indicator • Coolant temperature • Transmission temperature gauge • Hydraulic temperature gauge • Engine oil pressure gauge • Fuel gauge • Monitor • Hand throttle • Fuse/cover Switches
Working condition of:
• Four-way flashers • Beacon lights • Drive lights • Front wiper • Front washer • Left hand pedal • Auto-shift • Lift group coupler disconnect • Reversible fan • Lower wiper • Lower washer • Rear washer • Rear wiper • Intermittent wiper • Blade lights • Turn signals • Work lights • Hydraulic lock out • Saddle lock pin • Defroster fans • Brake pedal • Accelerator • Decelerator
Hydraulic controls, cylinders
Condition of:
• Hydraulics meter • Left hand float • Right hand float • Levers (do they stick?)
Fluid, drivetrain checks
• Engine oil cleanliness, level Any signs of antifreeze? Any sludge? • Antifreeze cleanliness, level Any signs of oil? Any compression bubbles while running? • Engine leaks Valve cover Head leaks Oil pan Transfer pump Fuel injection pump Fuel supply lines Inter-cooler hose Water pump Exhaust manifold Excessive blow by? Belts need replacing? • Radiator Condition of upper and lower mounts Leaks in top and lower tanks? Condition of core? Upper or lower hose leaks? • Air intake, including filter, canister and hoses • Alternator • Batteries • Cables • Starter • Transmission oil cleanliness, level Show sign of antifreeze? • Transmission leaks? • Transmission cooler • Hydraulic valves
Structural
Articulation joint pins and bearings ROPS – any bends, cracks or welds? Condition of:
• Steering cylinder • Wheel lean cylinder • Circle side shift cylinder • Blade side shift cylinder • Left hand blade lift cylinder • Right hand blade lift cylinder • Blade tilt cylinder • Saddle lock cylinder • Left hand articulation cylinder • Right hand articulation cylinder
Moldboard condition:
• Bottom edge crowned or straight? • Moldboard straight or bent? • Tightness of pivot bearings
Circle drive motor:
• Ease of rotation • Drive gear wear • Drive motor • Pinion seals
Circle:
• Wear on shims • Any welds or cracks? • Amount of circle shoes that need replacing • Tightness of ball sockets • Tightness of draft ball Front scarifier cylinder, shanks Front lift group (if applicable) Front axle pins and bushings Rear ripper/scarifier
Inspect tandem pivot joints
• Left hand tandem straight and dry? • Right hand tandem straight and dry?
Inspect all four axle seals for leaks
• Left front • Left rear • Right front • Right rear
Tires
• Remaining tread on:
• Left front steer tire___________%
• Left front tandem tire___________%
• Left rear tandem tire___________%
• Right rear tandem tire___________%
• Right front tandem tire___________%
Right front steer tire___________%


